A Giant Low-Cal Tostada for Lunch Equals Sheer Happiness

Mexican food is absolutely my favorite type of food–hands down. I remember when I was young, a friend of the family used to bring over authentic, crispy beef for breakfast! The golden-fried treasures came from one of the original Roberto’s tacorillas in San Diego, Calif. that stayed open 24 hours and offered the best Mexican food north of the boarder. They were (and still are) made with corn tortillas and shredded braised beef with peppers and tomatoes folded inside and then fried in lard. The tacos are topped with tons of shredded lettuce and queso fresco (a soft, mild milk-based cheese). Heaven. Pure heaven. And the smell! There’s just nothing like it. They’re especially yummy with the thin-textured hot sauce that only Roberto’s makes. Ok, enough of my trip down memory Mexican food lane.

My only problem is that if I let myself, I would eat beef tacos, tostadas, rolled tacos, enchiladas, quesadillas and chips with cheese and guacamole every day for breakfast, lunch and dinner….and my husband and kids would be seeing two of me!

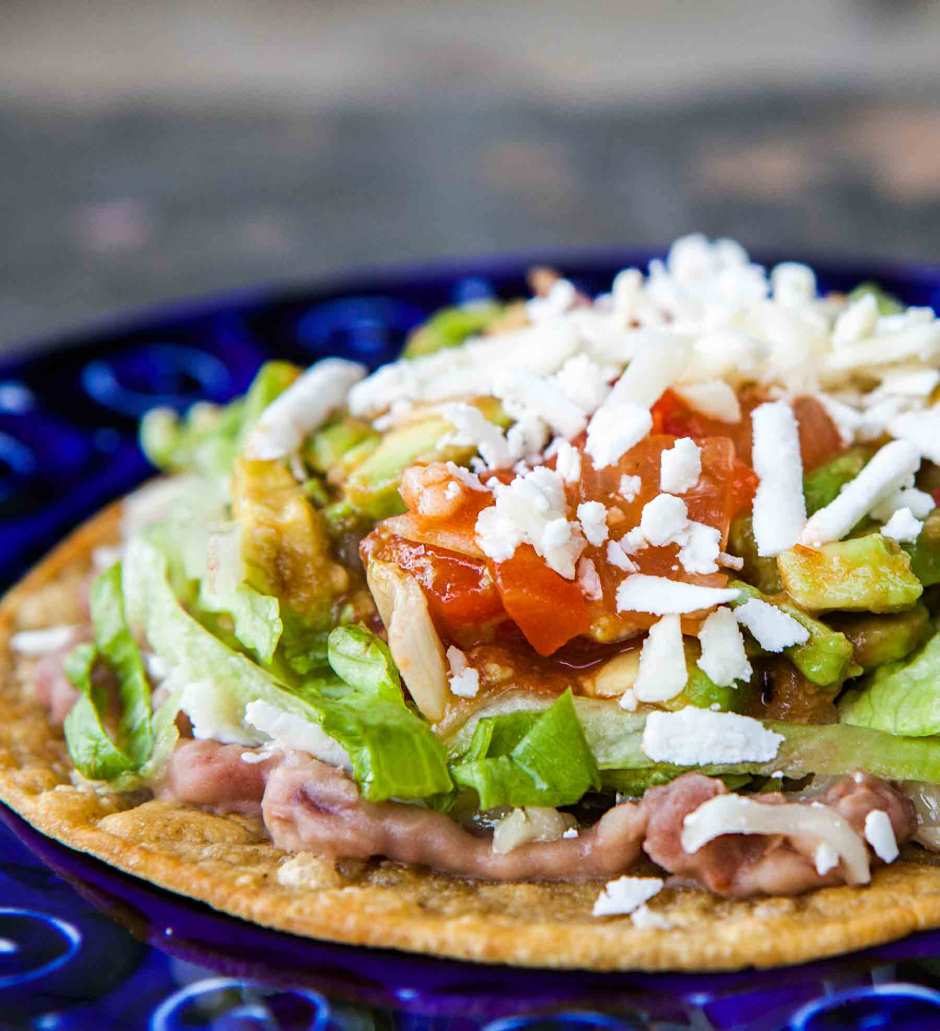
So, like I do with many recipes I come up with, I created a low-calorie version of my second-favorite Mexican food item. The crispy tostada. Yum. And this is especially satisfying and fast to make for lunch. Luckily, I live two miles from my job so it is so easy to make, eat and be back to work during my lunch hour.

In this case, spray oil (my good friend Pam) is the hero. Here are the ingredients I use. But the next most important thing is the technique you use in order to make it as yummy and enjoyable as the more “fattening” version.

-1 flour or corn tortilla (or enough for as many tostadas as you want to make)
-1 can of fat-free chile and lime beans (refried-style) or you could use drained black beans, cut up chicken, crumbled and seasoned hamburger or any other type of protein you like
-1/2 cup of shredded lettuce
-1/4 cup of shredded 2% cheddar cheese
-Any brand of hot sauce or salsa that you like
-Lite sour cream

Heat the oven to 450 degrees. Place foil on a baking sheet pan and spray both sides of a flour tortilla with spray oil. Place on the baking sheet and back on the middle rack. Check the tortilla at about the two minute mark to make sure bubbles haven’t formed on the tortilla. If there are bubbles, take a knife and pop it and push it down so that the tortilla lays flat. Once it has browned up you might want to flip it to make sure the other side is brown and crisp.

While the tortilla is cooking, heat up the amount of beans you would like to put on it (or other protein) and prepare the other ingredients. Top the crispy tortilla with all of your toppings and enjoy a yummy, fast, filling, low-cal lunch that is pretty nutritious too!

Simple Recipe for Working Moms: Smothered Pork Chops, Crock Pot-Style

Pork chops, especially thin-cut beauties, are a working mom’s best friend. They are super simple to make in so many ways. I usually just douse them with seasoned salt, a little garlic powder and pepper and pop them underneath the broiler. I turn them once and broil the chops until they are brown and sizzling. I even don’t mind if they are a little bit tough this way. My husband and I are a rare breed when it comes to tougher pork chops, I guess. If they turn out a little chewy, we just slap on some hot sauce and eat them like pop cycles. Barbaric, I know. I try to make moister ones for the kiddies.

Anyway, you could also spray them with a light coating of cooking spray, dip them in seasoned bread crumbs and fry them in a little olive oil. Or for a more decadent version, dip them in a beaten egg, then into flour, back into the egg, then into bread crumbs and fry in a deep pan of cooking or olive oil. Yum!

But, my favorite way to eat any type of pork, ribs included, is braised. Totally opposite from the leather-like texture of fully broiled chops. Cooking pork more than an hour achieves wonderfully tender, fall-off-the bone texture that is so comforting and filling. It just makes me think of fall. And using a crock pot to achieve the braising technique is so easy and perfect for a working mom who likes to cook.

So this recipe is inspired by a Vietnamese dish I remember trying when I was really young but it was made with tofu instead (and was probably only cooked for a half an hour on the stove top). But basically, except for the pork and the cooking time, the ingredients are the same. Thin pork chops are slowly braised in chicken broth and stewed tomatoes and smothered with onion and garlic. I also add an Asian flare by adding soy sauce and throw in a little tang with some balsamic vinegar. It sounds odd but it is so aromatic, kind of sweet, and a little exotic. It’s also very low-calorie.

The dish takes a bit of preparation the night before but the greatest thing about it is you just turn on the crock pot in the morning and all you have to do when you return home at night is make a pot of white rice.

Here are the ingredients you will need:

-2 cans of low-sodium, low-fat chicken broth
-2 cans of canned stewed tomatoes
-3/4 yellow onion
-2 smashed and minced garlic cloves
-5 thin-cut pork chops (I like the bone-in kind)
-3 tbsp. soy sauce
-2 tbsp. balsamic vinegar (or white wine vinegar)
-Seasoned salt and pepper
-Garlic powder
-1 Bay leaf

Season the pork chops on both sides with the seasoned salt, pepper and garlic powder. Place them inside the crock pot. Cut the onion in half and slice lengthwise, using only 3/4 of the onion, and smash, peel and mince the garlic. Place the onions and garlic over the top of the pork and pour in the tomatoes, chicken broth, soy sauce, balsamic vinegar and bay leaf. Stir all of the liquid ingredients together on top of the pork. Place the lid on top of the crock pot and refrigerate until the morning. When you leave the next day, set the crock pot for as long as you’ll be gone. When you return home, just make some white rice and serve the pork stew, if you will, over the top. I usually omit the liquid for the kids because it’s hot and a little messy for them. Voila! So good and so comforting. In fact, it’s my husband’s favorite.

Google+

Pork Chop on FoodistaPork Chop

Some Summer Steamer Clams for Supper

I’m not opposed to using frozen ingredients to make my life easier! Hey, I get the whole “Semi-Homemade Cooking with Sandra Lee” concept. So when I saw frozen steamer clams at Trader Joe’s, I thought this could be good or really, really bad. Verdict was good! However, I thought, this was one of those cooking challenges that required the right technique for it to turn out just right. Clams are tricky. The shells can be sandy and gritty, making for a very unpleasant eating experience if the shells are used inside the actual dish. Also, the little critters can get overdone and too chewy and make you just want to spit out the whole mouthful.

So what I noticed was there were two ways listed on the package to actually heat the clams all the way through–in the microwave or using a pan. My plan was that I wanted to toss them in olive oil with a plentiful amount of basil from the monstrosity of a house plant that I’ve so carefully nurtured this summer and some cut-up tomatoes and garlic and serve it all over spaghetti. Simple. Classic. And most importantly, scrumptious! So I knew heating them in the pan before or during the sauteing process could be volatile. They could either not heat through evenly or they could get overcooked and be aesthetically terrible. So I decided on concentrating my fresh flavors of olive oil, basil and tomato in the pan, and to heat the steamer clams in the microwave–using the “steaming” method they listed on the package. Then I would toss them with the mixture in the pan at the last minute and mix the whole thing with the pasta. My only concern was: would there be enough liquid or broth to coat the pasta since I didn’t have any chicken broth? Well, I thought, I could always add some pasta water.

Basil plants kept indoors can be an endless source of inspiration for aromatic dishes. 

Here’s the ingredients I use for this dish:

-1 box of steamer clams from Trader Joe’s
-Three large roma tomatoes, seeded and cubed
-A huge hand full of basil leaves rolled up together lengthwise and cut into thin strips
-Three large cloves of garlic, smashed and minced
-2 tablespoons of good extra virgin olive oil
-3/4 pound of pasta

I start by boiling the water for the pasta and cooking until al dente. After sauteing the fresh ingredients together in the olive oil until just soft, I add my drained spaghetti to the mixture and toss. Then lastly, I add the microwave-steamed clams and toss everything together. Luckily, there is some clam broth left from the steaming process, giving me enough liquid to coat the pasta along with the olive oil. You can also add more olive oil at the end. Add salt and pepper to taste.

Wow, talk about the perfect combo for summertime. Light, fresh, perfectly-cooked little clams and a classic combo of tomatoes and basil to top the pasta. My recommendation for wine is a crisp pinot grigio. Manga!

Enhanced by Zemanta

Google+

The Great Chili Cook Off: A Quest to Feed Some Hungry College Kids When They’re In Town

I don’t want to mention my age, but I have a much-younger cousin who is 22, is finishing up college, has only been to California twice now–and wow, can he and his friends eat! To me, that’s a good thing but if he and his friends were going to stay the weekend at our house as a stop-over on a road trip from Iowa, I had to switch my thinking to what I can make for a crowd since my family would be eating too.

I knew I could drum up something for at least one of the nights that would feed these hungry college kids without us all having to spend a small fortune on going out to eat or ordering take out. So I asked the big question: Do you like Chili? The answer was a resounding “yes!” Good!

I knew what I needed to do. Get some hamburger, canned stewed tomatoes, tomato sauce, onion and garlic and make sure I had enough good chili powder and a bay leaf (it really does make a big difference). That’s it! Chili, I think, is all about the technique you use to make it. And to go with it, I thought a good brand of corn bread mix would be great to make into individual muffins.

Here’s what I do and have been doing since my mom passed on the recipe to me when I was a teenager.

Gather the ingredients (You can also divide the recipe in half for a smaller portion):

-2 pounds of 15% hamburger
-Three regular cans of stewed tomatoes
-1 large can of good tomato sauce (the cheaper brands can taste tinny or more sour)
-1 yellow onion, finely chopped
-1 can of red kidney beans or pinto beans rinsed and drained (optional)
-6 cloves of garlic finely chopped
-2 bay leaves
-3-4 tablespoons of chili powder or more to taste
-Seasoned salt and pepper

Start by heating a large stockpot on high and adding the hamburger to the hot pan. Stir to break up the meat but try not to break it up too fine. Drain off any water that accumulates in the pan by placing a lid ajar over the pot and catching any meat that might fall into the sink. Draining the liquid helps the meat to brown and obtain some flavor. Next, salt the meat with the seasoned salt and pepper to your taste. Salting the meat helps the water to evaporate and the meat to brown further.

Zachary helps mom stir up the corn bread mix.

When the meat is brown, add your chopped onion and garlic and stir on medium-high heat until the onion and garlic are soft. At that point turn down the heat and add the chili powder. You don’t want to burn the chili powder because it will taste bitter. Add more if needed. Adding the spice at this point helps to impart flavor into the meat before you start to simmer the chili. Add the bay leaf now too, for the same reason.

Then add the stewed tomatoes and stir until they are hot and coated with the seasoning. Next, add the tomato sauce and about 2 cups of water. You will need this extra water since liquid will evaporate from the chili as you simmer it. Add more if you think it looks too thick compared to the time you will be cooking it. (The longer you cook it the more intense the flavor.)

Sophie gets in on the “mix” and can’t help herself to help!

Cook on low for about an hour, stirring occasionally. I usually place a lid on top but leave if off slightly. After about an hour you should be able to feed about six people! As for the corn muffins, just mix and bake the last 15 minutes before the chili is done. I usually serve my chili with condiments such as shredded cheddar cheese, sour cream, chopped tomatoes and chopped onions or scallions. We had some happy college students. My cousin even went back for fourth’s. Lucky my husband gave up his second bowl! That’s ok, cousin. It’s your second time to California and you deserve it!

Give Me A Great Big Quiche!

QuicheI love quiche. I know there are people who hate it–with a passion. It’s probably one of those things that you either absolutely love or just cannot even begin to like. A couple of years ago I ran into Paula Dean‘s recipe for Quick Quiche on the food network website. And wow, is it good. And the really cool thing is you can alter the recipe in so many ways. I even lighten it up a bit by using 2 percent milk cheddar cheese, lite mayonaise and whole milk instead of cream.

The original recipe calls for spinach and cheddar or swiss cheese. But I’ve made it with carmalized onions and bacon, just plain cheese, ham and cheese, and I’ve been daydreaming about all sorts of other combinations for different occasions. It’s definitely one of those savory, one-dish recipes that you can serve for breakfast, lunch or dinner. It’s pretty inexpensive too.

In fact, I served the spinach and cheddar and bacon and caramelized onion versions when my in-laws were in town. It was a great way to feed a lot of people at once and definitely economical. I just added a big bowl of a lightly-dressed salad and dinner was served!

As a mom, you have to love the fact that you can make a quiche on the weekends and get your kids involved to practice their egg cracking and mixing skills. The recipe also calls for measuring out tablespoons of flour, which my little boy can do with great precision. Little Sophie just loves to watch and get into all of the cupboards and drawers when my back is turned the other way, and remind me that the stove is ” ‘OT!” (So glad she is getting the hang of that information!)

So here is what we do at my house to make spinach and cheddar quiche and carmelized onion and bacon quiche (my two favorites!):

Preheat the oven to 350 degrees.

Then, gather all of the ingredients:

-1 package of two frozen deep-dish pie crusts (any brand is fine)

For spinach and cheddar quiche:
-4 eggs
-1 cup of shredded medium 2 percent milk cheddar cheese
-1/3 cup of minced white or red onion
-2 tablespoons of flour
-1 cup of whole milk (Paula uses cream)
-1/2 cup of lite mayonaise
-1 package of frozen spinach (defrosted overnight)
-Garlic powder
-Salt and pepper

For bacon and caramelized onion quiche:
-4 eggs
-1 cup of shredded medium 2 percent milk cheddar cheese

-1 cup of sliced white or red onion
-2 tablespoons of flour
-1 cup of whole milk (Paula uses cream)
-1/2 cup of lite mayonaise
-5 slices of bacon cut into bite-sized pieces
-Garlic powder
-Salt and pepper

Preparation for the spinach and cheddar quiche is pretty easy. Just combine all of the wet ingredients, add the flour and whisk. Unwrap the spinach and wrap it in paper towel to drain the extra water out. Add the spinach, onion, shredded cheddar cheese, garlic powder and a little salt and pepper, mix and pour into the pie crust.

For the bacon and caramelized onion quiche, start out by frying the bacon pieces on medium heat until fat is rendered and bacon is crispy but not too crispy. Place the bacon on a paper towel to drain and add the sliced onions to the hot bacon fat and continue to cook and stir until the onions are darker brown and sweet. Then combine all of the additional ingredients the same way as the spinach quiche, mix well and pour into the second pie crust.

Place both quiches onto a foil-line baking sheet and onto the center rack of the oven. Bake for an hour or until the tops are golden brown and a knife stuck into the center comes out clean. Cool a bit after baking and slice like a pie and serve. Life is good.

My kids seem to like the cheese version the best. I think it’s the green flecks from the spinach that throw them off. But all kids are different. I just cut up the slices as if it were scrambled eggs and they seem to go for it. It’s really a good source of protein for them. Cheers! (I think I might try a brunch-style version next time with smoked salmon, capers, swiss, and caramelized onions. Oh yes.)

Comfort Found In a Bowl of Beef Stew

beef stew

What do you make for dinner when you are trying to stay on a tight budget? For me, frozen chicken nuggets and french fries just won’t cut it. (Well, sometimes in emergencies.) And only rarely do we make that trip to McDonalds for the coveted kids happy meals and whatever random combos for us in order to have dinner on the cheap. No, I actually like the challenge of making something awesome out of meat and produce that is affordable but delectable when you combine it the right way.

Such is the case with beef stew. You just can’t go wrong with a steaming bowl of thick, rich stew with tender chucks of beef, carrots, celery and onion. The only drawback to making this dish is the time it takes to cook it. But, when it’s done, beef stew is a dish that my kids gobble up and my husband finishes with a satisfied smile on his face.
Here is what I put in it:
– 1 pound of beef stew chunks
– About four cups of water (or 2 1/2 cups water and 1 beer)
– 1 stalk of celery cut into small chunks
– Two carrots cut into small slices
– 2 potatoes peeled and cubed
– 3 cloves of minced garlic
– 1 small red onion cut in half and sliced into thin slices
– 1/2 tablespoon of Italian seasoning
– 2 bay leaves
– 1/4 cup of flour
– 1 teaspoon garlic powder
– Seasoned salt
– Black pepper
Prepare veggies and garlic ahead of time (save preparation of the potatoes until right before water is added to stew so they don’t turn brown). Heat oil in a cast iron dutch oven on the stovetop. Add the garlic powder, seasoned salt and black pepper to the flour. Using tongs, coat the meat in the flour mixture and shake off excess. Place the meat in the hot oil and cook on one side until golden brown. Flip and brown on the other side.
Add onions and garlic to the pan and stir, scraping up the brown bits from the pan. Add the Italian seasoning and bay leaves. Add water and reduce heat to medium/low, place lid on top and cook for about an hour and a half, stirring periodically.
Add carrots, celery and peeled and cubed potatoes and cook for 20 minutes more. You might want to add a bit more water before continuing to cook since the potatoes will thicken the stew. Add regular salt to taste.
I usually cool the meat and cut into small pieces for the kids and serve the veggies on the side. Talk about a wholesome, one-pot meal for the whole family. And cheap too. Definitely less than $10 for the whole dinner!

The Steak-House Meal At Home

Ok, so I do a lot of thinking about food. I sometimes wish we could just pick up and leave–with the kids in tow–and drive down to this little local bistro that has one heck of a happy hour menu at a great price! But it’s too nice of a menu and place to rush the trip. My son, now almost five, could probably sit and draw while my husband and I noshed on the chilled gazpacho soup garnished with scallop ceviche, avocado and cucumber ($4.50 a bowl) and followed it up with the beef bourguignon ($9) and the Australian lamb chops with port wine sauce ($12!). But we wouldn’t be able to savor the affordable gourmet happy-hour meal with the must-have glass of syrah or cab that the food deserves–unless we downed everything with extreme urgency before the “heeby jeebies” set in.

“I want down, mom. Can we go now? What’s that red stuff on the plate? Can I use my napkin as a karate bandana?”
And I won’t even go there–thinking about our little almost-two-year old little girl. She is so sweet. And then she realizes she is strapped in. Yikes! Does anyone have ear plugs. You can’t blame her. She just discovered she is her own little individual person.
“Mommy. ‘Et me dowwwwwwn!”
Ok, I know. One word. Babysitter. The thing is, money is so tight right now that the happy hour prices would just go out the window if we hired a babysitter for this venture. So I sit and stare at the happy hour menu and scheme to figure out how I am going to have some of those dishes. Soon.
And finally, this weekend, I got an idea. Why not make a dish from their menu at home and see how it turns out? Yes! So I decide on a traditional steak-house dish: Filet Mignon Wedge Salad. It’s simple. Char-grilled fillet mignon, sliced, and draped over a wedge of iceberg lettuce with yummy, rich bleu cheese dressing drizzled on top! Double Yes!
So I check out the filets at my local grocery store and sure enough, with it being the fourth of July weekend, they’re on sale. Two nice-sized filets for six bucks. Throw in iceberg lettuce and good bleu cheese dressing and the whole thing is $10. Well, I spied some fresh jumbo, raw shrimp so I threw 12 of those in the basket too! And of course, a nice bottle of cab.
Ok. Here’s what I did on Friday night:
1. Feed the kids, bathe the kids and put them to bed.
2. Have my husband light the coals (he refuses to get a gas grill and that’s ok!)
3. Salt and pepper the filets and skewer the shrimp through tail and head lengthwise and brush with oil that has been seasoned with “seasoned salt” and lemon and have my husband grill the steaks until medium rare (should still be tender to the touch when you push on the center with you’re finger but not too tender) and until the shrimp curl up slightly
4. While steak is resting and shrimp cooling a bit, quarter the lettuce and place one quarter on each dish
5. Slice steak and drape over the lettuce and drizzle bleu cheese dressing over all
6. Serve shrimp next to steak and lettuce combo

7. Open bottle of red wine and enjoy the food and several hours of good conversation, music and laughs! Now that’s a restaurant-quality endeavor.

California Dreaming

All right, so a girl can dream. I don’t have the ingredients in the fridge for this dish today but if I were to go home right now, kick off my work shoes and have a little time to myself without the kids, I would make this…

Shepherd’s Pie!

Yum. Yum. Yum.

Something about the comfort of the ground beef browned up with a classic veggie combo of carrots, celery and onion, and the twice-baked-potato taste of the creamy mashed potatoes spread on on top of the beef mixture inside a pie dish just makes my mouth water! Especially on a “June Gloom” day like this. It’s June but it feels like winter here next to the Pacific Ocean in California. Comfort food is good on days like this. And once I get a hankering going on in my head I can’t stop obsessing over it. So, I’m using this blog as my vicarious, mental kitchen.

Ingredients:

-Four russet potatoes, peeled and cubed
-1/4 cup of 2% milk
-1 tbsp. butter
-1 pound of 15% hamburger
-1 stalk of celery, chopped fine
-1 carrot, chopped fine
-Half of a brown onion, chopped fine
-1 clove of garlic, smashed and chopped
-Pinch of marjoram
-Salt & pepper
-1/4 cup of shredded cheddar cheese

Bring a pot of salted water to boil. Toss in the potatoes and boil until tender. In the meantime, start browning hamburger and drain off excess water/oil. Season with salt and pepper. Add carrots and cook a couple of minutes. Add celery and onion and season again lightly with salt and pepper. When veggies are soft, add hamburger mixture to a glass pie dish that is sprayed lightly with oil spray. Drain cooked potatoes. Add milk and butter. Mash with a hand blender for smooth consistency and add enough salt to taste and white pepper, if you have it. Black pepper is fine too. When potatoes are creamy spread them over the hamburger mixture with a plastic spatula. Sprinkle cheddar cheese all over the top. Bake at 375 degrees for 20 minutes. Let cool ten minutes. Slice into pie-like slices and serve. Kids might like it in a bowl with a spoon. Serve with a light salad on the side.

Oh, I’m telling you what! I could eat this for days. Luckily, today, I’m only dreaming and saving myself the calories. Instead tonight, I think I’m going the easy route: A little quality time with my husband and the kiddos, some spaghetti, canned sauce and steamed zucchini from the garden. Good times!

The First Dish

I’m ready to wrap up my workday and my mind is already on to the “second shift”–at least that’s what it was called in all those multiple women’s studies classes I took in college. Actually, I thought that term was so far fetched but now, the second shift is part of the everyday routine

Ok, and where does my mind wonder off to after thinking about picking up both kids at their respective preschool and daycare providers? Dinner! What’s for dinner? What could I make that’s not too much work, that is healthy, that my husband would find scrumptious, that wasn’t too slimy for my 4-year-old son and would be interesting to my almost 2-year-old little girl? And what will be the meal that is the cherry on top of my day–’cause for me, good food equals zen. Tall order!

And this doesn’t factor in that I have about a half an hour alone with Zachary and Sophie before Nicholas, my husband gets home. The same amount of time I have to get dinner on the table at a reasonable time.
“Outta the trash, Sophie.” “Nope, no candy today, Zachary.” “Only a few Goldfish for now. Save your appetite for dinner.” “No, Sophie we can’t go outside now. Mommy’s gotta cut up some veggies.” You get the point.
I wish my husband worked closer to home so that we could share parenting duties right after work on the weekdays. But for now, that isn’t the case.
So tonight, I have a go-to recipe that is quick, pretty low-cal, is pretty yummy to everyone and gets a laugh from the kids when I prepare it. I guess for the purpose of this blog I’m going to have to come up with names for these dishes that I have been practicing at for at least the six years that I’ve been married. This one is called: Chicken Scallopini served with white rice and steamed dill zucchini.
Ingredients:
2 big chicken breasts
1 cup of white rice
2 green zucchinis
Chicken broth
Dried dill
Seasoned salt and pepper
Preheat oven to 450 degrees
Use tongs to transfer chicken into a gallon-sized zipper bag and seal shut. (Here’s the funny part for the kids.) Use the flat side of a meat pounder to pound chicken to about 1/4″ thickness while making funny faces at the kids and saying: “It’s ok, mommy is definitely not mad or going crazy, she’s just making flat chicken tonight. Bock, bock, bock! (flap your arms multiple times then continue pounding, while secretly releasing the aggression you might have toward your boss or cube neighbor).
Next, transfer the chicken using tongs to a foil-lined baking sheet and spray both sides with Pam. Season both sides with seasoned salt, pepper and lightly with garlic powder. Place on the middle rack of the oven. Cook about 12-15 minutes, turning once if the top isn’t browning.
Now prepare your rice according to the package’s directions (2 cups of liquid to 1 cup of rice), using chicken broth in place of water. Use a pot with a steamer on top, which will be used for the zucchini when the rice is cooking. Cut the zucchini in half length-wise and then again. Then cut small pieces and place into the steamer after rice has come to a boil in the chicken broth, turn down the heat to low, and cover with a lid. Cook 20 minutes.
By the time the chicken is out of the oven and cooling, the rice and zucchini will be ready. Cut up half of one chicken in tiny pieces for the kids, and plate the other half for yourself. Dad gets the other piece of chicken. Mix a little margarine or butter into the veggies and salt and pepper and sprinkle with dried dill. Serve those on the side with the rice and voila! Dinner is served. Deep sigh of satisfaction.